Experimenting With Pirate Audio

The Problem:
I have an old radio that I want to refurbish and make into a streaming internet radio. Sure, I could just throw it away, but I’m not that wasteful. My uncles fixed radios and televisions, and they lost more and more work when electronics started getting cheap and people just threw them away instead of taking them to get fixed. I saw how they worked with soldering and reading schematics. I went with them to electronic stores to look for rare components that someone inevitably had to order from Taiwan via “a friend in California.”
The Solution?
After experimenting with a Raspberry Pi 4, I found out that a smaller version, the Raspberry Pi Zero W, would do the job of taking on a piece of software to stream the music and output it via a sound card. Then I did some more digging and found that MusicBox was based on Mopidy, a very customizable software package that allowed for music to be streamed via the Raspberry, but I still needed either a sound card or a module that allowed for sound to be converted into something that could be connected to a speaker.
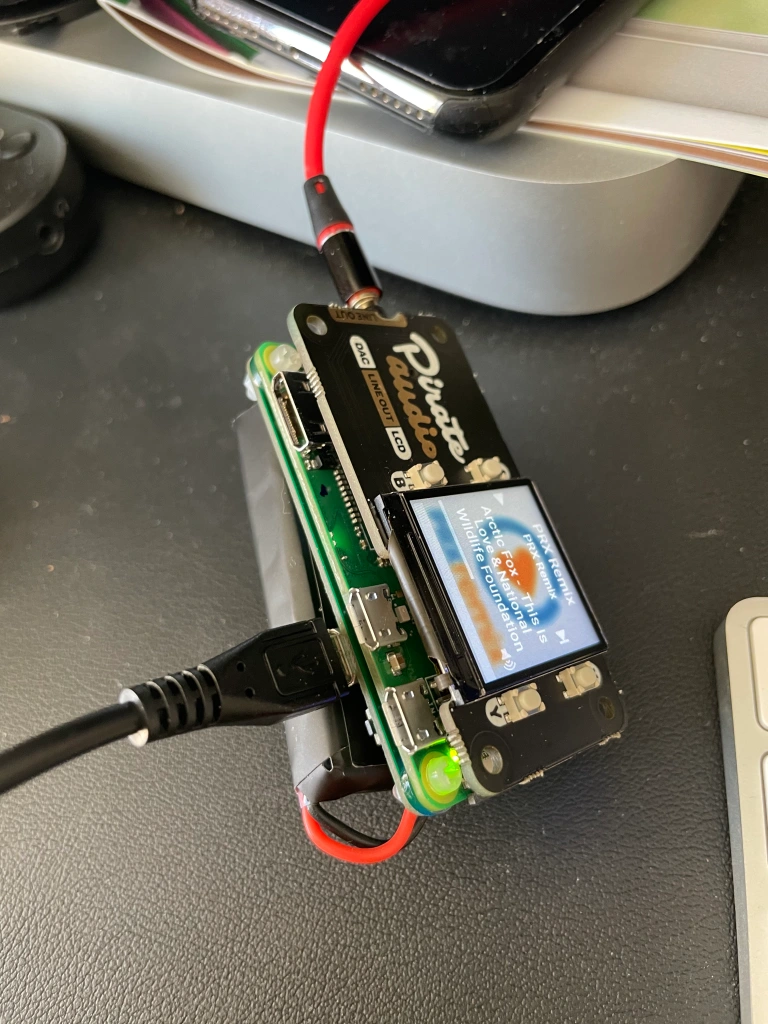
That’s where the Pimoroni Pirate Audio cards come in. They’re pre-made modules that connect to the Raspberry Pi (any size) via the GPIO connection and output audio to speakers or headphones. They also have a neat little LCD screen that lets you see what you’re playing and the album art. Finally, they have four buttons to control the music playback and the audio.
Ingredients:
- Raspberry Pi Zero WH: The smallest, simplest Raspberry Pi computer. The WH tells you that it has wireless (WiFi and Bluetooth) and a header. You can also get a W model, but you’ll have to solder the header yourself. I’ve only started experiment with soldering, so I’ll hold off on doing that for now.
- Pimoroni Pirate Audio DAC Line Out LCD module: A small module that includes a 1-inch by 1-inch LCD screen to show album cover and other information. It also has four buttons to help you control playback and volume. (The buttons are customizable. You’ll see what I mean below.)
- 3.5mm cable to connect from the DAC to a speaker. Other DACs can connect directly to speakers or to headphones. This one is a “line out” to a powered speaker with a 3.5mm jack. If you connect to speakers, you’ll need an amplifier if they’re not powered. (The Pirate Audio Stereo Speaker Amp does have enough power for two small 3W speakers.)
- Micro SDHC card (with an adapter to plug it into your personal computer). This will run the Linux operating system on the Raspberry Pi and store any MP3 files you may have.
- Micro USB power cable and power supply, 5 volts, 2.5 amps. (Some suggest getting something slighter more than 5 volts because the system will begin shutting down if the power drops too much below that. (Not all power supplies are made the same.)
- A personal computer to install the files into the SDHC card and to connect to the Raspberry Pi via terminal because we’ll be installing a “headless” Linux distribution.
- OPTIONAL: PiSugar battery supply. This will make the system even more portable.
- OPTIONAL: A Spotify Premium subscription. This is to stream music without interruption. Spotify also has podcasts and other audio. You don’t need it, but it is nice to have, and they are offering a free 3-month trial to see how you like it. It’s then $10 a month after that.
The Plan:
Install the software and hardware on the Raspberry Pi Zero WH and customize it to my needs. Then gut the old radio and find a way to fit the Pi inside. The Pirate Audio card with the amplifier and the two little speakers (speakers sold separately, and make sure you get 3W ones) should do the trick, and I don’t have to worry about a separate amplifier and/or power source for the speakers. One power line in should do the trick.
The Process:
First, I used the Raspberry disk imager to load the Raspbian Lite (a Linux distribution) image on the micro SD hard. I used an 8 GB card, which is plenty big for what I’m doing. You may want to have a bigger card if you’re also going to be loading a ton of MP3 files. You can load the full distribution, which you can then connect and control with a keyboard, mouse and monitor. I used the “Lite” version and just SSH into it via my Mac.
Next, I followed the instructions in this great blog post after trying several times to follow the instructions in the official Pimoroni site. If I followed the official instructions, which tell you to use a full Raspbian distribution, I ended up with an empty screen. I think that something in the latest Raspbian update interferes with how the display works. The lite version gave me no problems.
Next, over on the official instruction site, I followed the instructions to get the credentials for Spotify. If you don’t want to use Spotify, that’s fine. I signed up for the free three-month trial just to see how it would work. I mostly will use this to play my music with airplay (more on that later), and I tend to listen to online radio stations anyway.
Alright, so far, so good. Next, I went over to this GitHub project and followed the instructions to make the play button be a shutdown button. Instead of the automatic setup, I followed the instructions for the manual setup and copied the code for the buttons to be turned into a shutdown button. Now, because I used the lite version of the operating system, it was necessary for me to install “gpiozero” from this other site. What gpiozero does is set up the GPIO connectors to do different things. In this case, the code for the shutdown button inherits some of the functions from gpiozero:
from gpiozero import ButtonI did have to do some searching around because it seemed that gpiozero was not being installed correctly. One suggesting that worked was to run the uninstallation code for both the Python 2 and Python 3 versions of gpiozero and then reinstall it.
Finally, to make it all work like I wanted, I installed a few extensions from the Mopidy site. In my case, I installed the mobile browser controls to control it all from my phone, the TuneIn extension to listen to online radio stations, and the Autoplay extension so that the player will start at the last station I was listening to before I shut it all down.
There is one more bit of software that I decided to try, called Shairport-Sync. With it, I was able to get a signal on my iPhone telling me that the Raspberry Pi was available for me to stream the audio I was listening to on my phone. However, if something was already playing, that something was not being interrupted for the new stream. If something was not playing, the stream would be played just fine, but the radio (or Spotify) data stream would not come on after I finished streaming to the device.
(Please note that after each step above, I went through a reboot of the Pi to make sure everything that needed to be shut down for the next bit of code was indeed shut down.)
Yet to be worked on:
- When disconnecting the speaker, the system hangs and the music will not restart. I may need to do some coding with the Autoplay extension.
- Adding an on/off shim and some code to make sure the Raspberry shuts down completely and cleanly, so I don’t corrupt the files. I think the solution with the play button works, but I want to get this device into a case and install a button on the case itself. Besides, the only way to wake up the Pi right now is to disconnect and reconnect the power, so that button will come in handy for that, too.
- Some people have been able to create custom artwork for the stations they like and used that instead of the boring default artwork that comes with the radio stream.
Backing Up Your Work
Because so much time is spent on figuring out the configuration settings, you might as well create a back up of your work in case something goes completely wrong. (This happened to me a few times, where I added something new to the configuration, and I ended up killing something else.) It also helps if you keep notes on what you’re doing.
To back up your disk, just follow the directions on this blog post (and make sure to look in the comments section on how to give your computer permission to read/write the disk). If you’re running Windows, then follow these instructions. The Raspberry Pi official site also has these instructions, which use more of the terminal command to get the job done.
In Conclusion
At the end of all this, I have a handy little device that I can connect to any old speaker, and I hope to be able to integrate it into the old radio. If that works, I’ll probably do more coding and then some soldering to get some on/off switches on it, and a switch that changes the station. So stay tuned for that… And, as always, thank you for your time.
